How to Make a Teacher Pencil
If you are considering getting something special for your fav teacher than this idea might be for you! There is always something special about a handmade gift and the value it adds to the present. Not to mention you will not find it just anywhere! I #shamelessly say that I became a teacher just to have one and also to use one of those grader wheels to calculate scores!

You will be able to make two pencils with the supplies below:
- 1 – 1”x4” – 6ft Common Board ( I got mine at Home Depot)
- 1 – Krylon Spray Paint – I used Sun Yellow (Also available at Home Depot)
- I used Martha Steward Crafts Paints in the colors – Beetle Black in High Gloss, Gray Wolf in High Gloss, and Camellia Pink in Satin (I got mine at Michaels)
- Painters Tape (I ran out halfway through and used Washi Tape!)
- Sanding block (Home Depot)
- Screw eyes (to hang your creation, acquired from Home Depot)
- I used my Cricut machine with black vinyl to cut out the letters but you can use pre-made sticker letters found at your local hobby store. You can also paint the letters using a stencil or freehand!
- Optional *Ribbon if you want to dress your creation up in school colors or your person’s fav colors!
- Someone that knows how to cut wood and has access to wood cutting tools!

I purchased my Common Board at Home Depot, at times the boards are untrue in size so I cut my board to be exactly 6 feet. That is totally up to you but sometimes they are exactly 6 feet. After that optional cut measure 36 inches or 3 feet and make your cut at the 3 foot mark. This will give you two boards for two pencils.

Measure the center of your board which should be 1.75 inches and make your mark. I like the tip to be chubby so i measured 1.5 inches from the end on each side. Connect your lines making an upside down triangle. Carefully and with the proper safety precautions cut along the lines you drew. I used a table saw for this part.

I free handed some round edges for the eraser and had my husband nip the edges as close as possible. It does not have to be perfectly round, the wood is very soft and can be sanded to form a round edge.

Yay! So the cutting is done and now a little sanding to perfect the shape. The edges will be a little rough but as mentioned before the wood is soft and lends itself to sanding. With a sanding block carefully sand the freshly cut areas and along the board to prep for paint.

Use the painters tape to create triangles by cutting pieces. I free handed the triangles to give that authentic look of a sharpened pencil. Make a line at the top of the pencil with the painters tape. Do not worry about covering the entire top of the pencil as you will be going over that part with pink paint for the eraser.

Spray paint the pencil evenly with the Krylon Sun Yellow Spray Paint. Make sure to get the sides evenly as well. Two coats is what I did for my pencil so that some of the wood grain could be seen through the paint. You can do more coats if you choose to cover the wood grain. Let the pencil dry preferably in the sun so that the paint will bake in.

When the paint has dried, carefully peel the tape that is at the pencil point. Do not remove the top tape where the eraser end of the pencil is as you will be using that tape to mark your eraser line.

Time to make your lead! Place a tape along the tip of the pencil so that you can paint the lead part of the pencil. Do not worry if the line is a little askew or slanted it makes it look real! I used “Beetle Black” from Martha Stewart for the pencil tip. As the pencil tip dries off you can also paint the eraser part of your pencil. I used “Camellia Pink” from Martha Stewart for the eraser. As you can see from the pictures I just used the same tape from the spray painting yellow step.

When the paint has fully dried, carefully remove the tape from the pencil tip as well as the eraser part. You are now ready to paint the metal part of the pencil. I ran out of painters tape! So i used some washi tape and it worked just fine. Tape off the area that you want to be gray. I eyeballed the size but if you prefer a measurement I would go with 1 inch. I used Gray Wolf from Martha Stewart for the metal portion of the pencil. Allow your paint to dry.

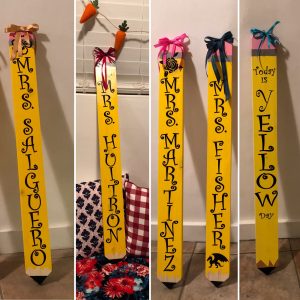
When your paint has dried remove the tape and you now have an awesome platform for your Teacher’s name!

For the letters I used my Cricut Explore Air to create the name in custom font and size. The height I used for the letters is 2.5 inches. However if your Teacher’s name is a little longer you might want to compensate with the height of the letters to make sure they will fit. If you do not have access to a Vinyl cutting machine such as the Cricut, you can purchase sticker letters from your local hobby store. Just be sure that the size of the letters will fit on your pencil. Another option is to paint the letters onto your pencil using a stencil or freehand!

Attach your screw eye at the top of the pencil as mentioned before the wood is very soft so I was able to attach it without the use of tools but it is up to you! Dress up your pencil with ribbon or other cute accessories to give it that special and unique touch. Sign the back if you like and you are ready to gift your Teacher Pencil! These make great gifts for Teacher Appreciation Day, birthdays, Welcome Back to School gifts, a New Teacher, maybe even a fundraiser? And it is even more special because it was handmade by you! You can even possibly make these from old wood pallets? Just an idea. Happy crafting!
