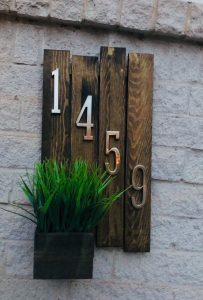
House Number Plaque
I have been wanting to take on this project for a while! This was a special gift for a birthday and housewarming gift. I already had the wood board which I got half off at Hobby Lobby and this is where my inspiration began. With a little bit of creativity, my saving mode on, and a few other supplies, I was excited to take this challenge on!
What you will need:
- Wood panel (I found this one at Hobby Lobby half price off)
- Wood box with plant (or without) I found this one at Ross Department Store
- Wood Stain of your choice (I just happened to find this one at Home Depot on sale and I liked the color “Oxford Brown”)
- The numbers for the address (I found these at Home Depot)
- Foam brush to apply the stain
- Picture Sawtooth Hanger to hang your creation
- Screws and drill to attach the planter box (Instead of using screws and a drill you can use liquid nails to glue the box)

If your panel has a string attached, you can remove the string as you will not be needing this to hang it. You can play around with the placement of the numbers and the planter box to get an idea of how you will like your plaque to look.

As soon as you decide on the placement, proceed to attaching the planter on the board with two wood screws. I wanted my planter box to be aligned evenly so i lined it up as close as possible to the edges. Place one screw on top and one on the bottom, making sure to put them through the thickest part of the board in the back. Alternatively, you can glue the planter box to the board with Liquid Nails, that sucker will never come off.
Since I screwed my planter on I went ahead and removed the planter box for the next part. If you are going to be using glue to attach the planter you might want to stain the board first than glue it on, it is up to you. Do a little test with the stain on the back of board to make sure this color looks good for you. If the color is good to go then proceed with staining the entire board. I stained the front and back.
Do a little stain test on the planter box and if you like what you see go ahead and stain the entire planter box. Once the board and the planter box dry reattach both pieces together with the screws. Attach the picture hanger on the back of the board. The hanger usually comes with its hardware to attach the hanger on the back.
Now this is the hardest part! Deciding on how you want your numbers to be arranged. Remove your address numbers from their packaging and move them around the plaque to see how you like them the most. Once you have decided how you want them, follow the directions on the packaging to attach the numbers to the wooden plaque. The numbers usually come with double stick tape and it was easy to apply. I messed up with the number 1. The tape lost its tackiness so I attached that number with a hot glue gun.
Listo! Your creation is ready for gifting or hanging outside your home. This little plaque adds some nice curb appeal to your home and also makes a nice house warming gift! Happy Crafting!


